


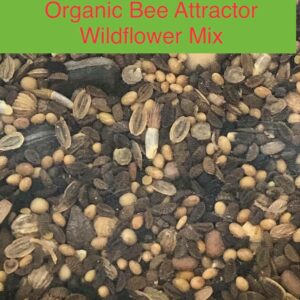


BEE HAPPY Organic Bee Attractor Wildflower Mix 13 Species 100 Seeds
- 13
Species of Wildflowers/Herbs - Non-GMO,
Organic - 100%
Pure Seed
PRODUCT DESCRIPTION
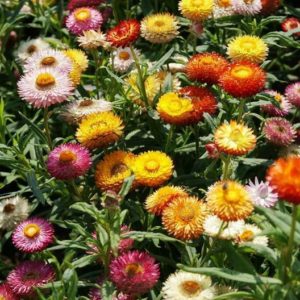
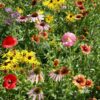
- Bee
Happy – Organic Bee Attractor Wildflower Mix - With
a wide spectrum of bee attracting varieties, this mix offers not only a
fragrant array of blooms, but a unique mosaic of colors. - Bees
aren’t the only ones who will be happy with this diverse wildflower mix!
FAST FACTS
- Name: Bee Happy – Organic Bee Attractor Wildflower
Mix - Number
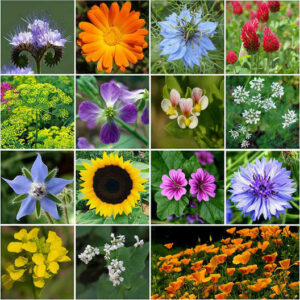
of Species: 13 - Mix
Contents: Lacy Phacelia,
Buckwheat, White Mustard, Coriander, Sunflower Taiyo, Dill, Radish, Calendula,
Common Mallow, Borage, Love in a Mist, Crimson Clover, Cosmos - Life
Cycle: 100% Annual - Light
Requirement: Full Sun - Planting
Season: Spring, Fall - Features: Organic, Attracts Pollinators, Easy to
Grow & Maintain - Color: Mixed
- Blooms: Spring, Summer, Fall
- Plant
Height: 25+ inches - Plant
Spacing: n/a - Planting
Depth: 1/2 inch - Sowing
Method: Direct Sow - Cold
Stratification: No - Hardiness
Zones: 3, 4, 5, 6, 7, 8, 9, 10
MIX CONTENTS
( I am personally excited to grow this! As an experienced gardener there are plants
in here I have never grown!) (Cheryl, Your Host)
Lacy Phacelia
- Phacelia tanacetifolia is a species in the
Boraginaceae (Borage) family … - It should be noted that there are a very large
number of species in the genus Phacelia.
Buckwheat
- Buckwheat, (Fagopyrum esculentum), also called
common buckwheat, herbaceous plant of the family Polygonaceae and its edible
seeds.
White Mustard (Butterfly Host Plant) Save the
Butterflies!
- Genus: Sinapis. Species: S. alba. Binomial
name. Sinapis alba. L. Synonyms. Brassica alba (L.) Rabenh. Brassica hirta
Moench. - White mustard seeds (right) compared with rice seeds (left). White
mustard (Sinapis alba) is an annual plant of the family Brassicaceae.
Coriander (use in your kitchen also!)
- Coriandrum is a genus of herbs in the family
Apiaceae containing the cultivated species Coriandrum sativum (coriander) and
the wild species Coriandrum tordylium. - The leaves and seeds of Coriandrum
sativum are used in cooking.
Sunflower Taiyo
- (H. annuus) A Japanese variety. Plants grow
5-6′ tall with large 10-12″ heads and short golden-yellow petals. - Huge
centers are covered with chocolate-colored velvet reminiscent of fur. - Always a
favorite. 70 days.
Dill
- Dill (Anethum graveolens) is an annual herb in
the celery family Apiaceae. - It is the only species in the genus Anethum. Dill
is grown widely in Eurasia, where its leaves and seeds are used as a herb or
spice for flavouring food. - These plants, like their fennel and parsley
relatives, often are eaten by black swallowtail caterpillars in areas where
that species occurs. For this reason, they may be included in some butterfly
gardens.
Radish
- Radish may also refer to any member of the
genus Raphanus (the “radishes”).
Calendula
- Calendula officinalis, the pot marigold,
ruddles, common marigold or Scotch marigold, is a … Genus: Calendula.
Species: C. officinalis. Binomial name.
Common Mallow
- Worldwide there are about 85 genera and 1500
species, including 27 genera in North America. Hollyhock, hibiscus, and cotton
are members of this family.
Borage
- Borage also known as a starflower, is an annual
herb in the flowering plant family … For related plants sometimes called
borage, see Borago … Genus: Borago
Love in a Mist
- Love-in-a-mist, Nigella damascena, is a
charming old-fashioned flower that blooms in spring and early summer. The genus
name Nigella comes from the Latin niger (black), referring to the intense black
seeds.
Crimson Clover
- Trifolium incarnatum, known as crimson
clover[1] or Italian clover, is a species of clover in the family Fabaceae,
native to most of Europe. It has been introduced to other areas, including the
United States and Japan
Cosmos
- Cosmos, genus of garden plants of the family
Asteraceae, containing about 40 species native to tropical America. - They have
leaves opposite each other on the stem and heads of flowers that are borne
along on long flower stalks or together in an open cluster. - The disk flowers
are red or yellow.
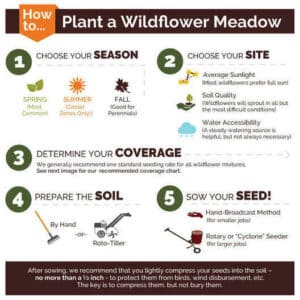
HOW TO PLANT FLOWER SEEDS
Store
your seeds in a cool, dry and dark location.
Most
seeds have a long shelf life, but heat and moisture will cut that life short.
Dedicate
a drawer or cabinet to storing your seeds where you can also house your
gardening journal close at hand for dreaming, planning and preparing.
As
many experienced gardeners are aware, planting flower seeds is a relatively
simple task; but like any worthwhile endeavor, it does have its challenges.
The
following steps are designed to assist the home flower gardener in establishing
a successful – and stunning – flower garden for years to come!
1 –
When To Plant
It is
a pleasant surprise for many gardeners to learn that flower seeds can be
successfully installed at various times throughout the growing season. Though
spring is the most common and conventional time of the year to sow flower
seeds; successful results can also be achieved by planting in summer and fall
as well. This seasonal versatility is a great advantage to the flower gardener
and brings many diverse benefits and possibilities.
Spring
Planting: For most temperate regions of the United States, spring planting is
best carried out within a month or so after the final frost of the winter
season. The exact date will naturally vary based on your region and the
severity of the winter season. The important thing is to not ‘jump the gun” and
plant too early; if seeds are installed prior to a late-season frost, they will
be lost for the season and will need to be re-seeded.
Summer
Planting: Summer planting is advisable for cooler areas where temperatures
don’t hover at 80 degrees or more for long periods of time.
Fall
Planting: Though it may seem unusual to plant flower seeds in fall, it is
actually the preferred time of year for many seasoned wildflower gardeners.The
main benefit: a jump-start in bloom the following spring! However, if you do
decide to plant your seeds in the fall, the trick is to do so after the first
killing frost of the season and when the ground is almost frozen to eliminate
any chance of germination. Use caution when considering the best time to plant
as weather patterns can never be guaranteed.
2-
Site Selection
It
may sound obvious enough, but choosing the most advantageous site on your
property is a very important determinant in the eventual success of your flower
garden. The most important factors to consider in this regard are the amount of
average daily sunlight, the relative quality of the soil, and the accessibility
to a water source like a hose or a sprinkler.
Though
many flowers do tolerate some filtered shade – and a few actually thrive in it
– the vast majority are definitely sun-lovers and will likely demonstrate the
strongest bloom where exposure is greatest. Therefore, the general rule of
thumb when considering the optimum planting site on your property is “the more
sun the better”. This naturally means that areas with little or no tree
coverage and as little obstruction from any structure such as a house, garage,
or barn are best.
Lastly,
when choosing the best site for your seed installation, the availability of a
steady watering source is helpful, but not usually necessary. In most regions
and during most seasons, natural rainfall will be sufficient to provide the
water necessary for a successful bloom. However, if you live in a particularly
arid region, are planting during drier months, or are simply experiencing
prolonged drought, it will definitely be to your advantage to water your site
every other day or so for the first few weeks after planting until root growth
is established.
3-
Prepare the Site
This
is an absolutely vital step in the installation of any successful flower seed
project. Though it may sound tempting to randomly cast your seeds into thin air
and hope they will sprout, it is simply a waste of time and money to do so on a
site that has not been properly prepared for planting. Though many flower seeds
are tenacious by nature – others are delicate and need pampering. Therefore,
the best rule of thumb is to always remove as much unwanted debris from the
site as possible before planting.
There
are several ways to effectively remove existing growth and cultivate your soil,
and the size of the site will typically be the deciding factor in which method
is ultimately chosen. For smaller sites, a rake, hoe, or shovel is often
sufficient to do the trick of removing unwanted grass, weeds, etc., while for
larger sites, a roto-tiller is often the preferred method. Regardless of what
tool or machine is used, the important thing to remember is that the more
growth that can be removed, and the more the soil can be loosened, the better
the environment for which your seeds to ultimately thrive.
The
bottom line is: work the soil as best you can, but don’t panic when some weeds
sprout along with the flowers!
4-
Time to Plant!
So
now you’ve got some sweat on your brow and you’re ready to plant! There are
many effective installation techniques, but again, the size of the project will
probably determine which makes the most sense for you. The two methods that are
probably most advisable for the home-owner are 1) the old fashioned
hand-broadcast method (for smaller jobs), and 2) the use of a rotary or
“cyclone” seeder (for larger jobs).].
The
former involves simply scattering the seed evenly over the site by hand, while
the latter accomplishes the same results through the use of a hand-cranked
spreader that can be purchased relatively cheaply at any garden center.
Regardless of which sowing method you choose, we strongly recommend mixing your
seed with regular “sand box” sand at a ratio of about 5 parts (sand) to 1 part
(seed). This allows for more even distribution and also provides a convenient
way to mark which portions of the site have been seeded and which have not.
This is not a required method for a successful planting, but most will find it
a simple, affordable, and practical step after sowing, we recommend that you
lightly compress your seeds into the soil – no more than a ½ inch – so as to
protect them from birds, wind disbursement, etc. The key here is to compress
them, but not bury them. If the site is of a manageable size, you can
accomplish this by simply walking over the portion that’s just been seeded, or
if it’s a larger area, you might want to use a standard seed roller; often used
when planting grass seed.
Now,
you’re finished! It’s time to kick back and watch the “seeds” of your labor
take root!
SEED STORING
- Store your seeds in a cool, dry
and dark location. - Most seeds have a long shelf
life, but heat and moisture will cut that life short. - Dedicate a drawer or cabinet to
storing your seeds where you can also house your gardening journal close
at hand for dreaming, planning and preparing.
Customer Service
- Upon receipt of your package or
box, be sure to open immediately and check the contents. - The products you have just
received are perishable and care should be taken to ensure their future
viability. - Your success and happiness is
our success and happiness! - We have the friendliest and
fastest customer service you’ve ever seen so don’t hesitate to contact us!
Fast and Free!
- Free shipping!
- Your seeds will ship the day
after payment via USPS First Class mail! - Please check our feedback – we
have FAST shipping! If you don’t receive your seeds in a timely
manner please message us. - On purchases over $25 we ship
USPS First Class PACKAGE with Tracking
Free Wildflower Gift Pack
- Free Wildflower Gift Pack
shipped with orders over $10 (must be purchased same day) - Gift Pack contains minimum of
50 Seeds!
30 Day Return Policy


Hayden (verified owner) –
So far so good!
Charles (verified owner) –
I was happy about the quick delivery and that the seeds actually sprouted within 7 days
Owen (verified owner) –
Very well worth the money.
Leo (verified owner) –
I would absolutely recommend this seed to anyone looking to grow veggies this year. I decided to do starts this year and just three days after planting
Bryan (verified owner) –
I would absolutely recommend this seed to anyone looking to grow veggies this year. I decided to do starts this year and just three days after planting