


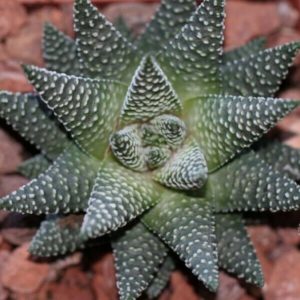


Tulista
Pumila Seeds
Common name: Pearl Plant, Miniature Aloe
Family: Asphodeloideae
Genus: Tulista
Description:
Tulista pumila is a succulent plant from the Western Cape,
South Africa. It was previously named Haworthia maxima or Haworthia pumila. In
some old records it is also occasionally listed as Haworthia margaritifera. It
is a popular plant in cultivation, though it can be slow growing. It is not
known how long the plants live for, but some specimens have been kept in
captivity for over 40 years. The plant requires well-drained soil, and it is
one of the few Tulista species that thrives in full sun. The leaves usually have
an olive-green to brown color.
Germination:
Always
begin with fresh, dry seed.
Step
1: Fill
a small pot to the brim with specialty cactus soil or mix your own. Gently
press the soil down to level it off. Inorganic
grit, sand, or pumice gives the soil the appropriate drainage and aeration. This type
of soil composition is mandatory for cactus and succulent growth.
Step
2: Just
before you are ready to plant the seeds, soak them in warm water for 30 minutes
or so. This
loosens up the seed coat and activates germination. Opuntia species
have very tough seed coats and require a few days of soaking in warm water. After you
have soaked the seeds, sprinkle them across the top of the level soil. Do not
press the seed into the soil unless the seed is exceedingly large.
Step
3: Gently
sprinkle just enough inorganic top dressing over the top of the soil and the
seed to cover completely.
Try not to bury the seed in the top dressing. Water
carefully and allow the pot to drain completely.
A
NOTE ABOUT WATERING: The
use of distilled or fresh water is imperative, as to help prevent bacterial and
algal growth during step four. If
your tap water tastes of chlorine, it is too chlorinated for your plants and
you should consider using distilled water. The
chlorine will burn the tender young roots and can cause iron chlorosis,
adversely affecting or terminating growth. Careful
watering can be done by either by letting the pot stand in half its height of
tepid water for a few minutes, or by
gently watering from the top, taking care not to wash away the top dressing. In both
cases, allow the pot to drain completely.
Step
4: Cover
and seal the pot with some sort of plastic container which allows light to
filter through. This
could be a supported plastic bag, sealed around the pot with rubber bands, or a
plastic tub as shown in the picture. The idea
is to create an environment that will trap heat and moisture-just like a
greenhouse. Many
things will work, be ingenious and creative! However,
be careful not to leave the seedling pot standing in water. Transfer
the pot to an area with bright indirect light of about 70 degrees F if you have
chosen a plastic cover which is clear and colorless. If you
have chosen a container that is clear but colored, say blue or green, you will
want to place it in a location with a little more light and don’t
increase the temperature. If
you have chosen a container which is slightly fogged or cloudy, you will want
to place it in a cooler location,
65 degrees F, which gets at least 4 and no more than 8 hours of direct sun,
with the remainder of the day in bright indirect light. Remember,
late morning and afternoon sun is considerably hotter than early morning or
early evening sun. In
general, think of the plastic container as if it were sunscreen. Clear-colorless
plastic allows the most light to penetrate, clear-colored plastic allows a
little less light to pass through, and fogged-colorless plastic allows even
less light to infiltrate. In
all cases, the inside of the plastic container will heat up. Be
careful not to fry your tender young plants! If
the walls of your container lose moisture and become dry during germination,
water sparingly, reseal, and return to warm well-lit location. If algal
growth sets in, remove the cover and allow the seedling pot to air out a little
while wiping the cover down with a no more than 1 part bleach to twenty parts
water solution (5% bleach in water). Allow the
cover to dry. Recover
and seal the seedling pot and transfer back to a warm and well-lit location. Continue
to clean the plastic container as necessary.
Step
5: Although
above ground the newly sprouted seedlings appear to be well on their way, below
ground they have disproportionably small root systems and cannot readily absorb
the nutrients they require to flourish into maturity. Therefore,
the seedlings should be kept in plastic container, at high humidity until they
are nearly overgrown.
High humidity facilitates water and nutrient
absorption in the roots and through the leaves until proper roots systems
establish.
Step
6: After
the seedlings have overgrown, protect your fingers by wearing gloves, or
wrapping them with tape, and gently remove each seedling from the original
nursing pot.
This is much easier if the soil has remained moist.
Step
7: Gently
repot the seedling into a pot filled level, and to the brim, with cactus
potting soil, and top dress with sand, gravel, or pumice. Water
three or four days later. Do
not return the cactus to the plastic humidity chamber.
Store Policies
All seeds will come in a resalable
plastic zip lock bag wrapped in a protectant so the seeds are not damaged by
shipping machines. All seed packets contain no fillers or other weeds or seeds
mixed in. Most have been harvested by hand & all test at a high germination
rate.
Seed Count
All seed counts should be considered estimates as the seeds is
packaged by hand, there is 2-3 more or less in a bag. We do our best to
ensure accuracy and will often add extra seeds. However, all estimates are
final.
Shipping
Seeds will ship without tracking numbers. Items
will be shipped 1-3 business days of receiving payment. Plants will be shipped
via USPS. Shipping usually takes anywhere from 3-5 days.
Feedback
If you do not satisfy with the purchase, please do not leave
negative/neutral feedback. Contact us for solution, We’ll try our best to
fix the problem as soon as possible.
Important! Please Read!
All seeds have been test sown to ensure germination.
Please familiarize yourself with growing conditions and instructions for your
seeds before you plant them, as all seeds are different. Basic growing
instructions can be found under each listing.
We Cannot Guarantee how much you will be able
to grow, as too many variables come into play, soil condition, your ability to
garden, weather etc. I guarantee that they arrive as described and are in good
viable condition and the germination rates are accurate.


Kayden (verified owner) –
The seeds had a great germination rate
David (verified owner) –
So far so good!
Alan (verified owner) –
These seeds came right up and started producing squash. Can’t ask for more than that.
Samuel (verified owner) –
Very healthy seeds! Well worth it.
Riley (verified owner) –
So far so good!